Introduction
This guide should empower you to assemble your Zarplotter to start your first drawing.
-
-
The pulley attaches to the motor shaft with two set screws.
-
The order of operations is important. Follow the video!
-
-
-
Insert wisdom here.
-
-
-
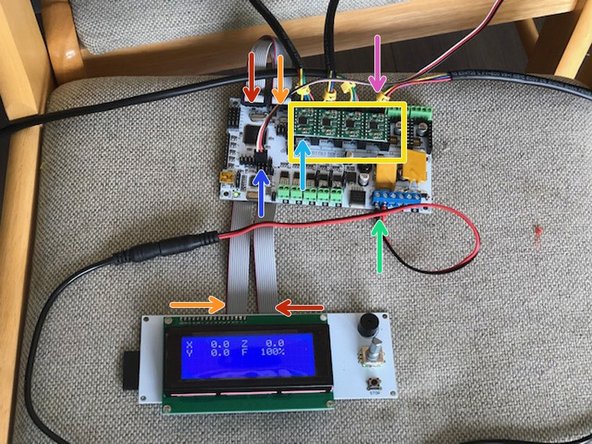
Connect female power plug, red wire to +.
-
Attach LCD cables. Note orange and red cables swap sides AND flip over. Same as Makelangelo. If power is connected the LCD will only light up in the correct wiring.
-
If required, with power off, remove all four driver chips and make sure all three DIP switches are pressed down.
-
With power off, adjust the dial on each chip. A multimeter reading between the dial and the bottom right pin of each chip should read 0.17v when power is on. DO NOT turn the dial when power is on.
-
With power off, connect each motor. The yellow wire must be on the left.
-
Connect the servo extension cable to pins in the EXP3 zone. There is a small black arrow on the right end of EXP3. The cable connects on the bottom row, with the black wire on the right (one pin under the arrow)
-
-
-
We do not supply the board on which you will draw. It should be square, flat, and smooth. Measure it and mark the center for later. The board pictured is 600mm*600mm and is good for an A4 drawing.
-
tighten the clamp screws to hold the motors on each corner. the first motor is NW, the second NE, the third SW, the fourth SE. The order is very important!
-
Feed timing belt around a pulley, through the idlers, and out to the pen holder. Maintaining tension is crucial to accurate drawings.
-
Attach the servo extension cable to the servo. The extension cable white/red/black should connect to the servo orange/brown/red.
-
Alligator clips are a great way to hold your paper down during drawing, and can also make sure the servo cable does not catch on anything.
-
-
-
If you purchased your zarplotter from us then your firmware is already installed.
-
You can download it from https://www.marginallyclever.com/product...
-
All upload steps are the same as our makelangelo firmware update tutorial EXCEPT that in configure.h you have to change #define MACHINE_STYLE POLARGRAPH to say #define MACHINE_STYLE ZARPLOTTER before upload.
-