-
-
Make sure the arm is not holding anything or the added weight could cause the arm to drop downwards.
-
If taking the weight off is difficult, hold the robot hand before turning off power.
-
Turn off power at the red switch on the control box.
-
-
-
Move the arm into "home" position, where all sensors would nominally report x=0, y=-90, z=0, u=0, v=0, and w=0.
-
turn power on. robot will hold in this position.
-
-
-
Use the Arduino software from step 10 to connect to your Sixi robot.
-
In the text field at the top of the serial window, type D19 P0 (P + number zero) and click Send. (D19=toggle D17 stream) Confirm the D17s have paused.
-
type D23 and click Send. (D23=Calibrate Sixi) This copies the current angle values to the live home position. D17 will now report D17 0 -90 0 0 0 0 -
-
type M503 and click Send. (M503=report settings.) The reply should match the last D17 value before D23, because the home position is subtracted from the raw values to get the adjusted position.
-
Type M500 and click Send. This saves the new home position. If you do not M500 and reboot, the home position will not be changed.
-
We need a much better way to accurately align the robot. Close is OK We want better.
-
-
-
send G0 F5 A1. This sets the feedrate to 5 degrees/s and acceleration to 1 degree/s. Be prepared to turn off the main power if a move makes you nervous for any reason. Better safe than sorry!
-
Send G0 X5. This should turn the X motor (the bottom joint) 5 degrees clockwise (if the clock is facing up). Send G0 X0 to return to home position.
-
Send G0 Y-95. This should turn the Y motor (the bottom joint) 5 degrees clockwise. The elbow will retreat from the direction the hand is pointing. Send G0 Y-90 to return to home position.
-
Caution! Do NOT send G0 Y0. Y0 is 90 degrees forward. There is a high chance your arm will drive down into a table or obstruction.
-
G0 Z5 will turn the elbow down toward the base.
-
G0 U5 will turn the wrist clockwise (the clock faces towards the elbow).
-
G0 V5 will turn the wrist down towards the base.
-
G0 W5 will turn the hand clockwise (the close faces towards the wrist).
-
-
-
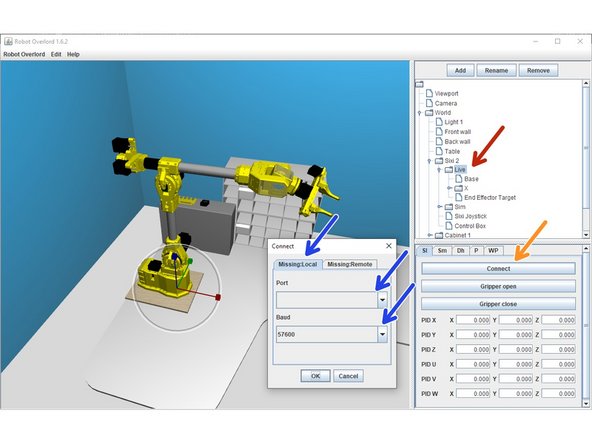
Run the Robot Overlord app (https://github.com/marginallyclever/robo...)
-
Select World > Sixi 2 > Live from the top right panel. The bottom right context panel will change. Make sure Arduino serial window is closed, as only one USB connection can exist at a time.
-
Click Connect in the context menu.
-
Choose Local, choose your USB port, and make sure the baud rate is 57600. Click OK to connect with those settings.
-
If the software connects successfully, one of the simulations will "snap" to match the live position.
-
CAUTION! The live robot may immediately begin driving towards the simulated position. Best to have the simulated arm in a known safe position.
-
If the real robot and the live version in the software do not match, return to a previous step and recalibrate the home angles.
-
-
-
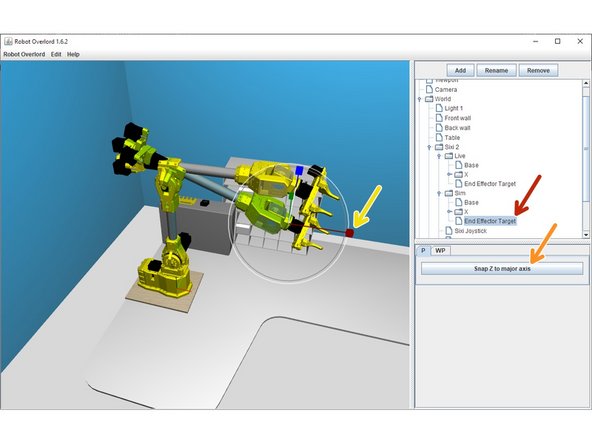
Select World > Sixi 2 > Sim> End Effector Target. Handles will appear in the 3D scene at the hand.
-
Gently drag the handles to move the target. The live robot will drive towards your simulated target at all times while connected.
-
Snap to world axis will first turn the hand to face the nearest world axis, then the remaining two axies. Good for pointing straight sideways or up/down.
-
Use SHIFT to switch to rotation mode.
-
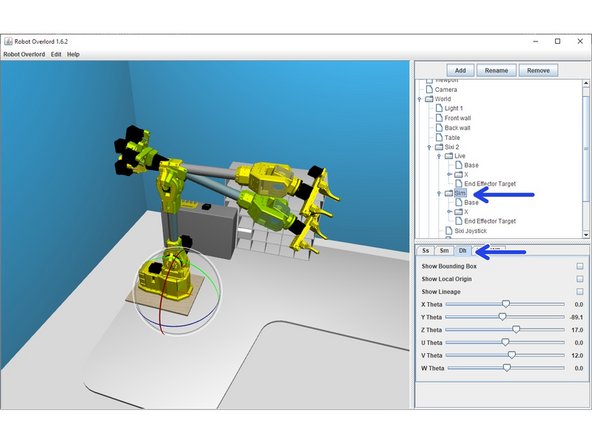
World > Sixi 2 > Sim > Dh will allow you to directly access joint angle values if you prefer this method of driving.
-
Use F1, F2, and F3 to change the frame of reference to world, camera, and local, respectively. Try them out and see for yourself!
-
Almost done!
Finish Line


