Introduction
Instructions for running the software for the first time, preparing the drawing and sending it to your plotter robot. There is more than one way to Prepare art and more than one way to Run the robot. It's OK to skip some steps.
-
-
-
Choose your OS
-
Click the link of your choice to download the Java installer app.
-
Run the installer app when the download is done.
-
-
-
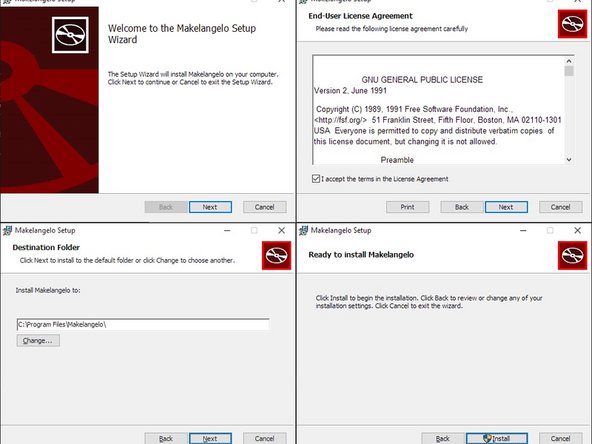
Makelangelo Software for Windows, Mac, and Linux can be downloaded from two places:
-
-
-
After downloading the application, run it and follow the steps therein to install Makelangelo Software.
-
-
-
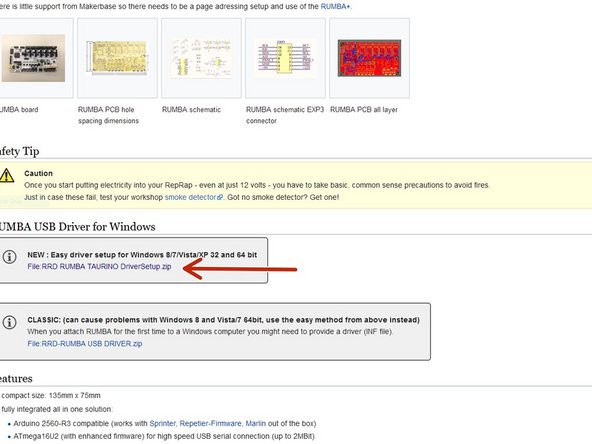
Makelangelo robot uses the RUMBA control board in the robot. To talk to your computer you may need to install a driver.
-
If you are on Windows, please make sure you already have the drivers for the RUMBA board from https://reprap.org/wiki/RUMBA#RUMBA_USB_...
-
-
-
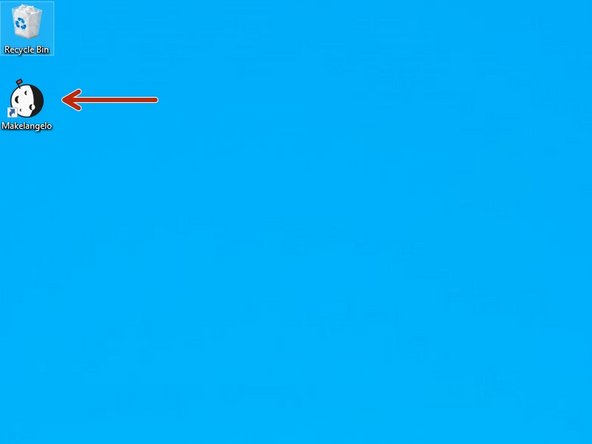
Double click on the app in your PC.
-
A dialog will ask you to choose your preferred language.
-
Don't see your favorite? Help us help you! https://crowdin.com/project/marginallycl...
-
-
-
Open the System Preferences by Selecting Apple Menu > System Preferences
-
Click Security & Privacy under the General tab.
-
Click the icon labeled Click the lock to make changes in the bottom-left corner.
-
Enter your username and password into the prompt that appears and click Unlock. (If you have no password, this can be left blank).
-
Under the section labeled Allow applications downloaded from:, select the option "Anywhere". On the prompt that appears, click "Allow From Anywhere."
-
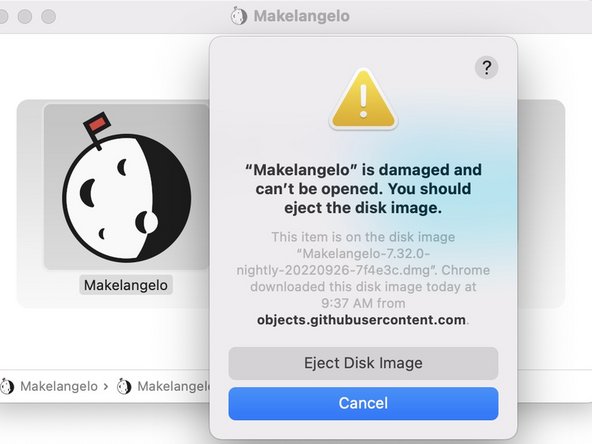
If that doesn't work, open a console and entering the command sudo xattr -cr /Applications/Makelangelo.app
-
This is due to this bug
-
-
-
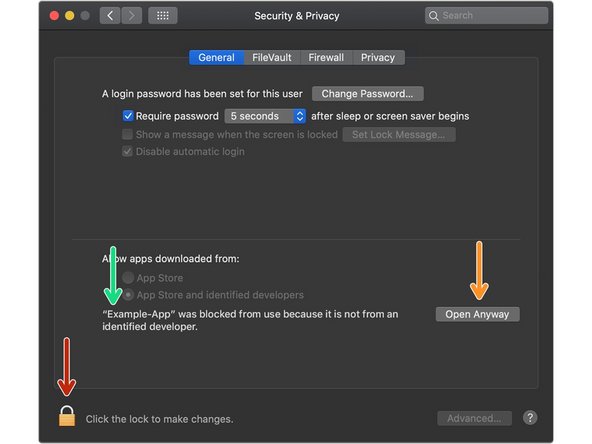
OSX may block the Makelangelo Software because it is from an "unidentified developer".
-
Click the apple icon in the top left, then System Preferences, then Security & Privacy. Having just tried to run Makelangelo-software*.jar, it should appear in this message.
-
You might need to unlock to allow security changes.
-
Click Open Anyways.
-
Your security for this version of the app should now be set forever. Next time the app updates you might need to do this again.
-
-
-
In the main window you can drag to pan and scroll the mouse wheel to zoom the what you see is what you get preview.
-
The File menu is where you can load images including SVG, DXF, Scratch 3 programs, and bitmaps like photographs or your favorite meme.
-
The Settings menu controls the paper, pen, and plotter preview. The default paper size is A2.
-
The Generate Art menu creates different styles of algorithmic procedural art. Try it and see!
-
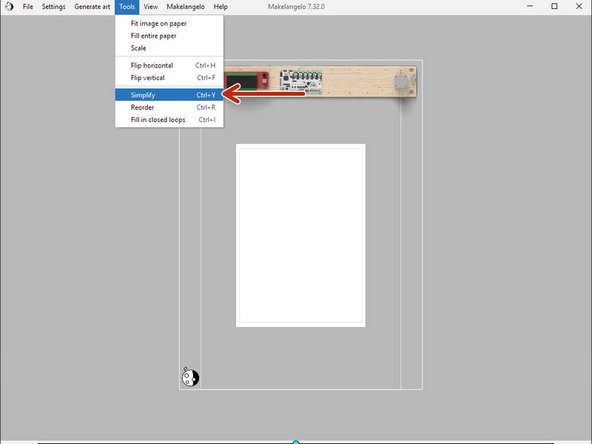
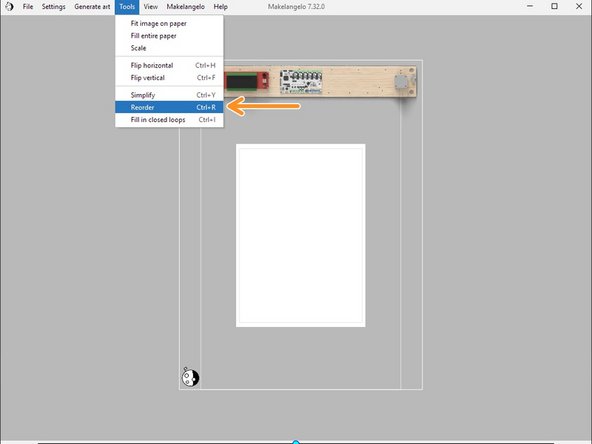
The Tools menu will change your art after being loaded/created. Scale, flip, and optimize for drawing tools like Simplify and Reorder.
-
The View menu can move the camera with zoom to fit but also show travel moves and advanced features like render style which reveals how the robot thinks about the art being drawn.
-
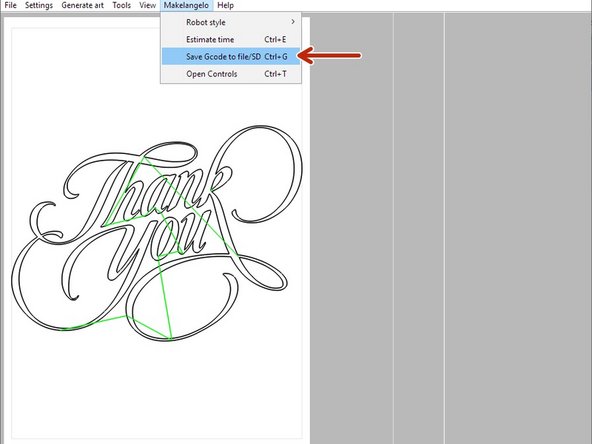
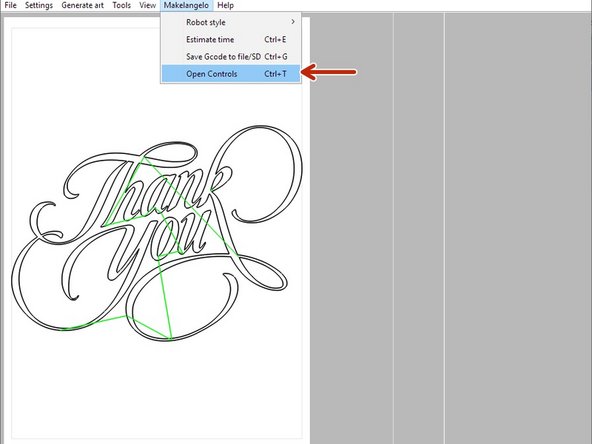
The Makelangelo menu controls the cosmetic preview of the robot, the drawing estimate time, robot commands save GCODE to SD card/disk, and finally Open Controls to talk live to a connected robot.
-
The Help menu has links for our Discord forums, a check for updates features, and more.
-
-
-
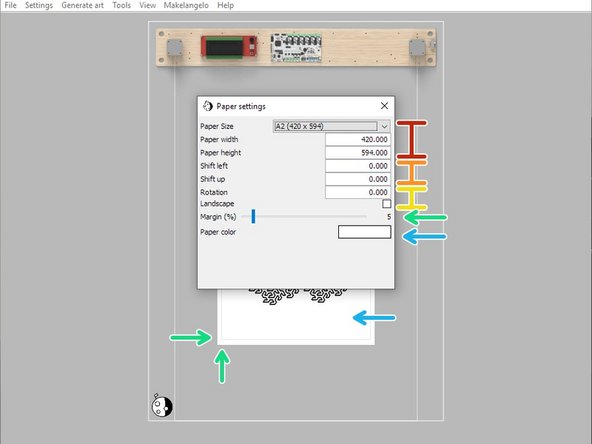
Paper size will automatically change the width and height based on pre set values.
-
Shift will move the paper inside the printer.
-
Rotatewill turn the paper. Landscape will instantly switch between 0 and 90 degrees.
-
Margin on your paper will prevent the pen from going off the edge.
-
Paper color is great for experiments with silver/gold pens on colored paper.
-
-
-
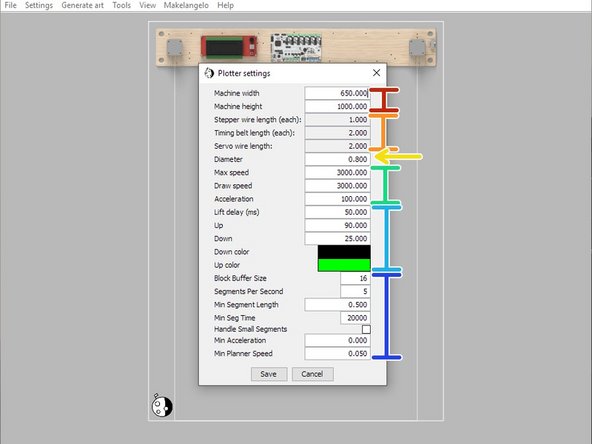
Machine width and Machine height control the size of the maximum allowed drawing area, aka the work area.
-
If you are making a DIY plotter the Stepper, Timing belt, and Servo length (meters) will help you plan your design.
-
Diameter controls the size of the pen tip on the paper. This is used by nearly every algorithm. The default size of a Sharpie tip is 0.8mm
-
speed and acceleration affect horizontal and vertical movements, only. Experiment and share your results in the forums.
-
bigger Lift delay makes the pen rise and fall from the paper more slowly, which helps prevent bouncing. Up and Down are angle values. The default is 90 for up and 40 for down. Up color can only be seen when View> Show travel moves is on.
-
The remaining settings are advanced parameters used for time estimates and should only be changed by expert users.
-
-
-
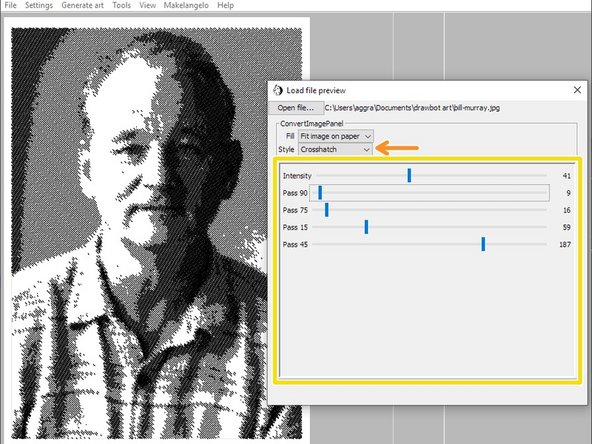
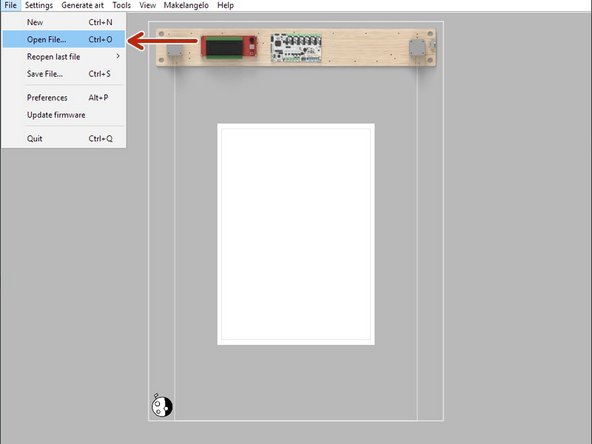
Click File > Open File... and select your PNG, BMP, JPG, GIF, or PIO image file.
-
The Style list lets you choose one of several image-to-line converters.
-
Most styles will have additional settings to tweak.
-
When you are satisfied, close the dialog and proceed to Makelangelo > Save to SD card or Makelangelo > Open Controls. (we recommend the SD card)
-
-
-
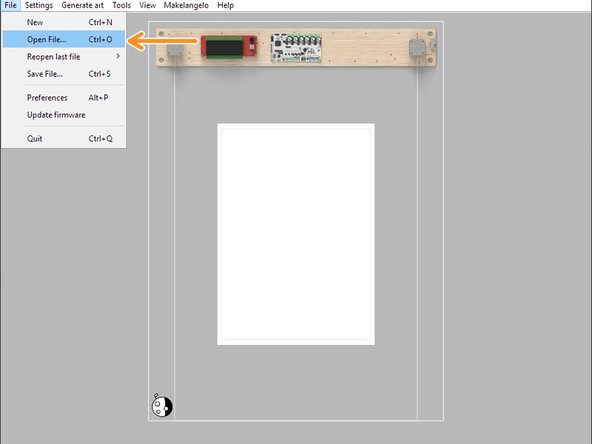
Click Open File... and select your DXF, SVG, or GCODE file. The image will be automatically scaled to fill the paper margins.
-
When you are satisfied, close the dialog and proceed to Makelangelo > Save to SD card or Makelangelo > Open Controls. (we recommend the SD card)
-
-
-
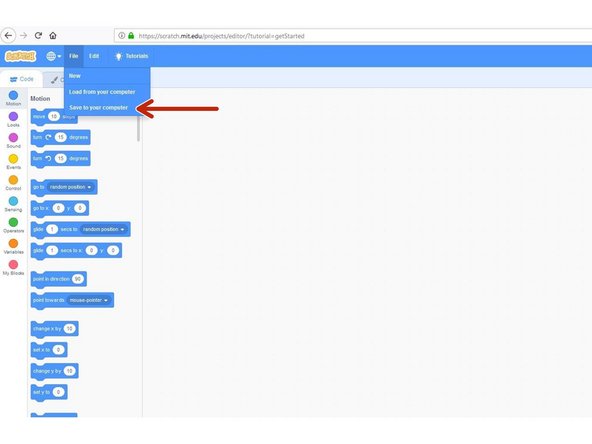
Build your Scratch drawing at https://scratch.mit.edu/.
-
Click File > Save to your computer.
-
Click Open File... and select your SB2 or SB3 file. The resulting program will be automatically scaled to fill the paper margins.
-
When you are satisfied, close the dialog and proceed to Makelangelo > Save to SD card or Makelangelo > Open Controls. (we recommend the SD card)
-
-
-
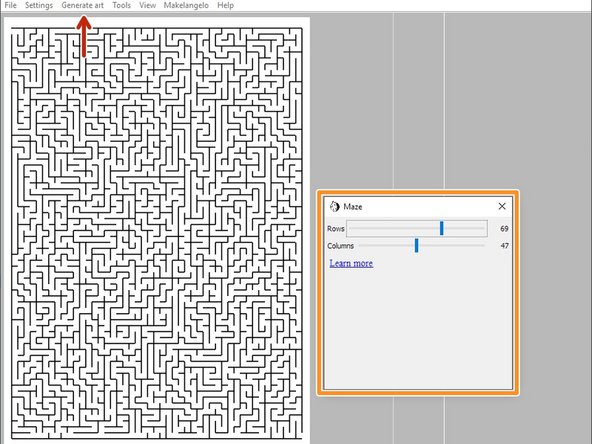
Click Generate art and select a style. Here the user has chosen Maze.
-
Many styles have sub options that can be adjusted. Experiment!
-
When you are satisfied, close the dialog and proceed to Makelangelo > Save to SD card or Makelangelo > Open Controls. (we recommend the SD card)
-
-
-
Simplify looks for short lines that - added together - would equal one longer line and makes the swap.
-
Reorder rearranges the existing lines to reduce the total amount of travel moves. Try it when "show travel moves" is turned on!
-
-
-
Put the SD card in the computer and click Makelangelo > save to file/SD card. Follow the steps and save the file to the SD card.
-
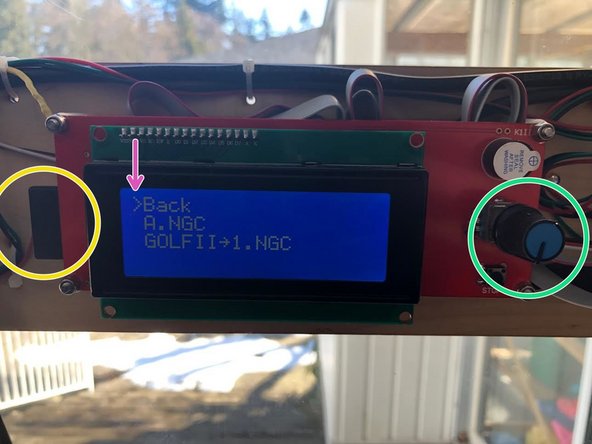
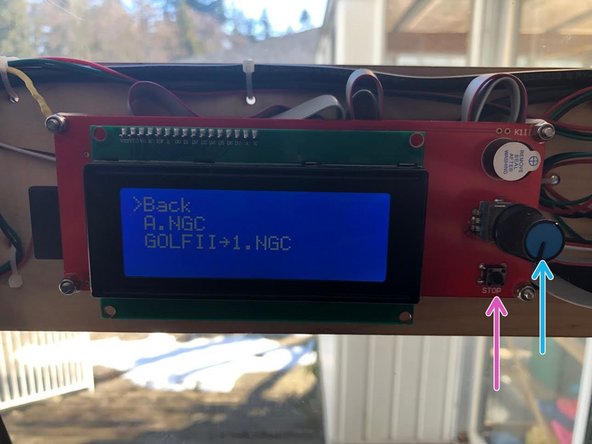
Eject the SD card and plug it into the robot on the left side of the LCD panel.
-
Click the dial, scroll down to print from media, click again, scroll to the file, and click one more time. Follow the prompts on the LCD panel.
-
Don't forget to Find home on the robot before starting your drawing! Find home can also be done through the LCD menu.
-
-
-
Plug a USB cable from the robot into your PC running Makelangelo Software.
-
Click Makelangelo > Open Controls.
-
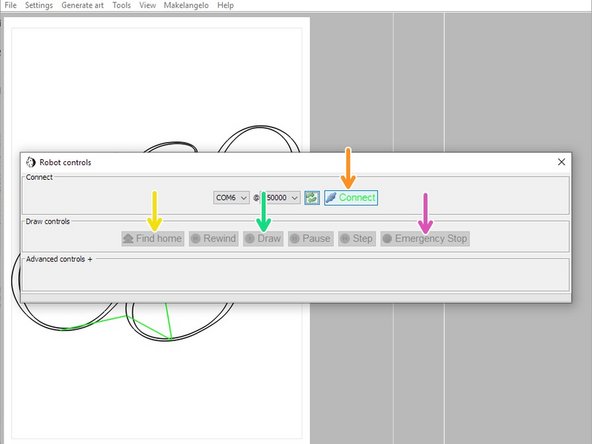
Choose a port and click Makelangelo > Open Controls.
-
If you have no port then your robot is not on, not connected, or your operating system has a security issue.
-
click Find home. Your robot should move the pen head down and the counter weights up until the weights touch each switch twice.
-
Click Draw. You will be reminded to setup your pen in the pen head. Now is a good time to take the cap off the pen!
-
The same warning appears on the LCD panel. You much click the blue dial by pressing in, once. The machine will begin to draw.
-
If something is going wrong with your drawing, you can press the reset button on the LCD panel or EMERGENCY STOP in the app.
-
-
-
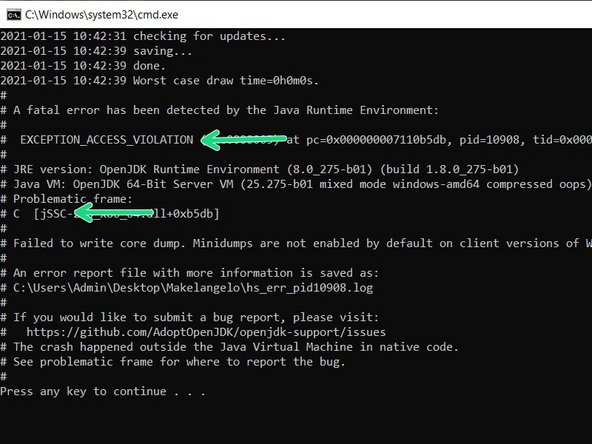
This error often looks like Windows crashes when you click Connect.
-
In Windows press Windows Key + R to open Run.
-
Type control and press OK to open Control Panel.
-
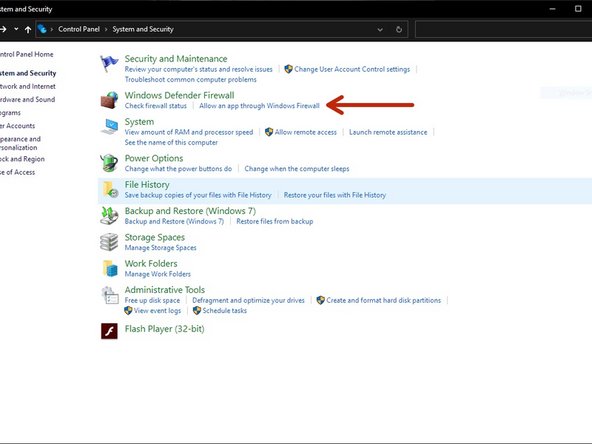
Click on System and Security, then Windows Defender Firewall, then Allow an app or feature through Windows Defender Firewall
-
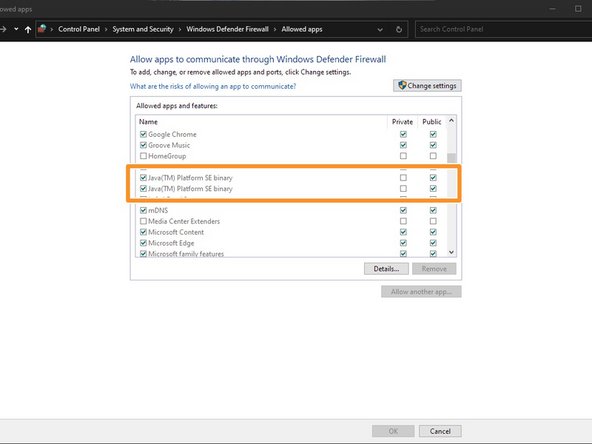
In the allowed app window, scroll through all the apps. Locate the Makelangelo. If it does not appear, locate Java(TM) Platform SE binary.
-
If it is unchecked, the app is blocked on the Firewall. Check the app and click OK.
-
-
-
Take a picture.
-
Post it on social media. Some great tags are #plottertwitter, #plotter, and @imakerobots so we can reshare it
-